Introduction
Supervised learning in computer vision is fundamentally about building a model that can transform an input x into an output y.
Using Blender, we have seen how we can generate arbitrary scenes, and in this post, I will look at how we can create Semantic Segmentation Maps and Depth Maps.
While writing this post, I found this post by Tobias Weis to be beneficial for understanding rendering nodes.
For a more industrial solution, I suggest looking at the bpycv project on GitHub.
The Code
Let’s start by importing the bpy library and removing a cube in the scene.
import os
import bpy
bpy.data.objects.remove(bpy.data.objects['Cube'], do_unlink = True)
Objects
Let’s create a ground plane and then place three dragons on it.
I’m using the dragon model from the Stanford scanning dataset.
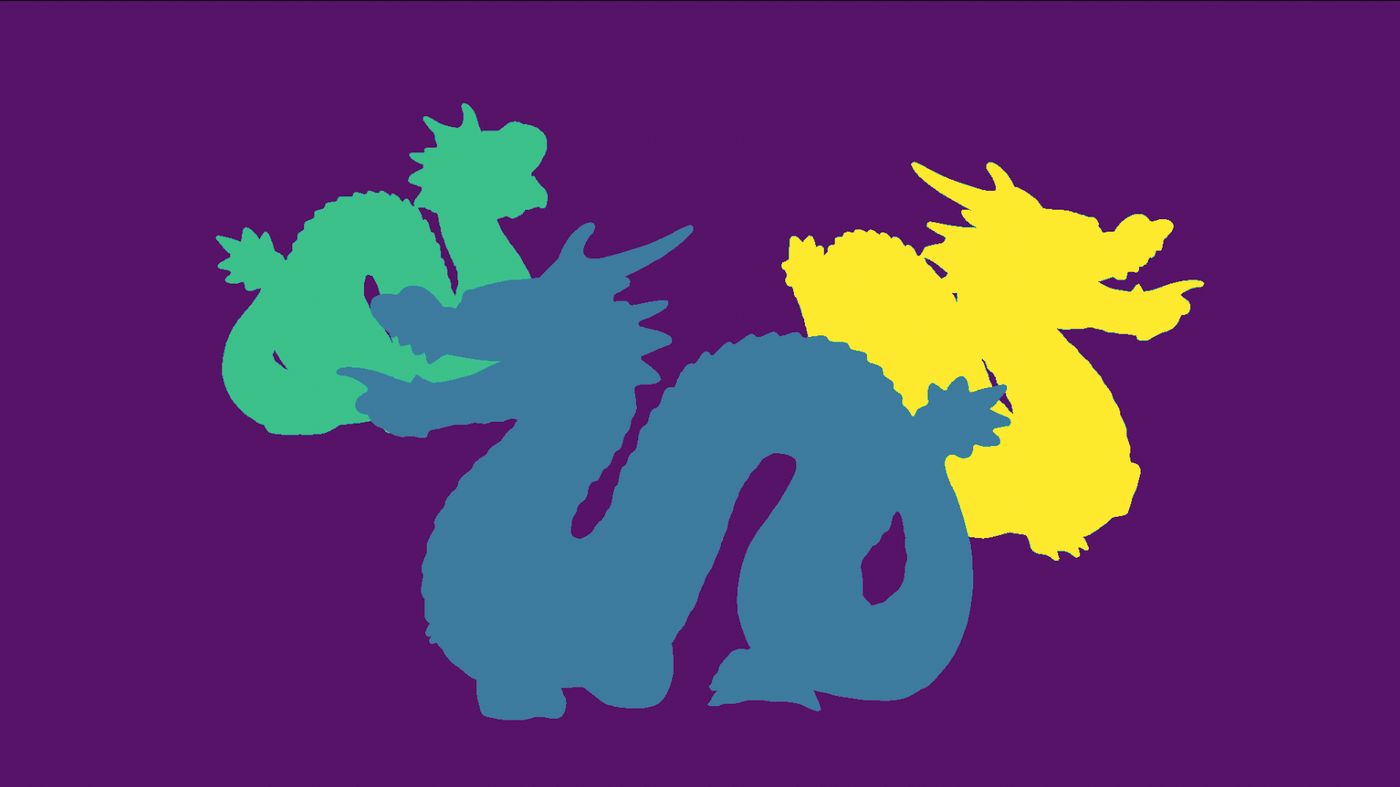
A key point to note is that I’m assigning each dragon a unique index or identifier. Later during the rendering process, the renderer will tell us the object’s index that makes up each pixel. This will allow us to generate a pixel-by-pixel semantic map of the image.
def create_dragon(location, rotation, rgba, index):
        #Load the mesh
        bpy.ops.import_mesh.ply(filepath=os.getcwd()+"/dragon_vrip.ply")
        ob = bpy.context.active_object #Set active object to the variable

        ob.scale = (10,10,10)
        ob.location = location
        ob.rotation_euler = rotation

        #Assign the object an index, which is used to generate a semantic segmentation map
        bpy.context.object.pass_index = index

        #Create and add material to the object
        mat = create_dragon_material('Dragon_'+str(index)+'_Material',rgba=rgba)
        ob.data.materials.append(mat)

def create_floor():
        bpy.ops.mesh.primitive_plane_add(size=1000, enter_editmode=False, align='WORLD', location=(0, 0, 0), scale=(100, 100, 1))
        mat = create_floor_material(material_name='Floor', rgba =  (0.9, 0.9, 0.9, 0))
        activeObject = bpy.context.active_object #Set active object to the variable
        activeObject.data.materials.append(mat)

create_floor()
create_dragon(location=(0,0.78,-0.56), rotation=(np.radians(90),0,0), rgba=(0.799, 0.125, 0.0423, 1), index=1)
create_dragon(location=(-1.5,4.12,-0.56), rotation=(np.radians(90),0,np.radians(227)), rgba=(0.0252, 0.376, 0.799, 1), index=2)
create_dragon(location=(1.04,2.7,-0.56), rotation=(np.radians(90),0,np.radians(129)), rgba=(0.133, 0.539, 0.292, 1), index=3)
Materials
I will create a semi-translucent plastic material with some subsurface scattering and a reflective coating for the dragons.
def create_dragon_material(material_name,rgba):
        mat = bpy.data.materials.new(name=material_name)
        mat.use_nodes = True
        nodes = mat.node_tree.nodes

        nodes["Principled BSDF"].inputs['Base Color'].default_value = rgba
        nodes["Principled BSDF"].inputs['Subsurface'].default_value = 0.5
        nodes["Principled BSDF"].inputs['Subsurface Color'].default_value = rgba
        nodes["Principled BSDF"].inputs['Clearoat'].default_value = 0.5
        return(mat)


def create_floor_material(material_name,rgba):
        mat = bpy.data.materials.new(name=material_name)
        mat.use_nodes = True
        nodes = mat.node_tree.nodes

        nodes["Principled BSDF"].inputs['Base Color'].default_value = rgba
        nodes["Principled BSDF"].inputs['Clearcoat'].default_value = 0.5
        return(mat)
Light & Camera
def configure_light():
        bpy.data.objects["Light"].data.type = 'AREA'
        bpy.data.objects["Light"].scale[0] = 20
        bpy.data.objects["Light"].scale[1] = 20

def configure_camera():
        bpy.data.objects["Camera"].location = (0,-4.96579,2.45831)
        bpy.data.objects["Camera"].rotation_euler = (np.radians(75),0,0)

configure_camera()
configure_light()
Renderer
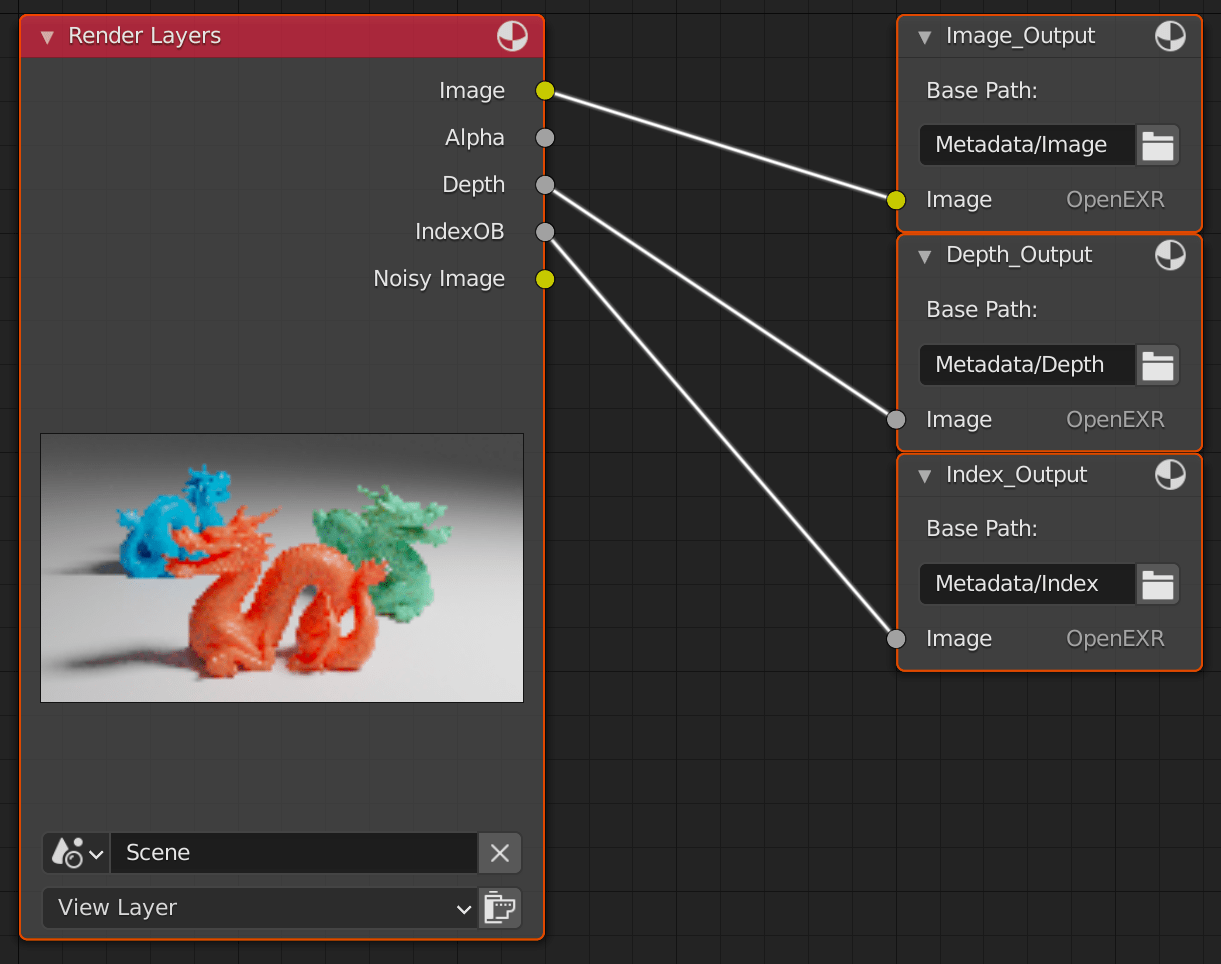
Much of the complexity comes in configuring the renderer.
In particular, we need to create three different output nodes and then link the relevant output from the render to each node.
We also need to configure the renderer to record the object index, which we use for building our semantic map.
def configure_render():
        bpy.context.scene.render.engine = 'CYCLES'
        bpy.context.scene.render.filepath = os.getcwd()+"/Metadata"

        #Output open exr .exr files
        bpy.context.scene.render.image_settings.file_format = 'OPEN_EXR'
        bpy.context.scene.cycles.samples = 1

        # Configure renderer to record object index
        bpy.context.scene.view_layers["ViewLayer"].use_pass_object_index = True
        bpy.context.scene.view_layers["ViewLayer"].use_pass_z = True


        # Switch on nodes and get reference
        bpy.context.scene.use_nodes = True
        tree = bpy.context.scene.node_tree
        links = tree.links

        ## Clear default nodes
        for node in tree.nodes:
            tree.nodes.remove(node)

        # Create a node for outputting the rendered image
        image_output_node = tree.nodes.new(type="CompositorNodeOutputFile")
        image_output_node.label = "Image_Output"
        image_output_node.base_path = "Metadata/Image"
        image_output_node.location = 400,0

        # Create a node for outputting the depth of each pixel from the camera
        depth_output_node = tree.nodes.new(type="CompositorNodeOutputFile")
        depth_output_node.label = "Depth_Output"
        depth_output_node.base_path = "Metadata/Depth"
        depth_output_node.location = 400,-100

        # Create a node for outputting the index of each object
        index_output_node = tree.nodes.new(type="CompositorNodeOutputFile")
        index_output_node.label = "Index_Output"
        index_output_node.base_path = "Metadata/Index"
        index_output_node.location = 400,-200

        # Create a node for the output from the renderer
        render_layers_node = tree.nodes.new(type="CompositorNodeRLayers")
        render_layers_node.location = 0,0

        # Link all the nodes together
        links.new(render_layers_node.outputs['Image'], image_output_node.inputs['Image'])
        links.new(render_layers_node.outputs['Depth'], depth_output_node.inputs['Image'])
        links.new(render_layers_node.outputs['IndexOB'], index_output_node.inputs['Image'])

configure_render()
This is what it looks like in the Blender compositing interface when the configuration is complete:
Finally, we can render the scene.
bpy.ops.render.render(write_still=True)The Results
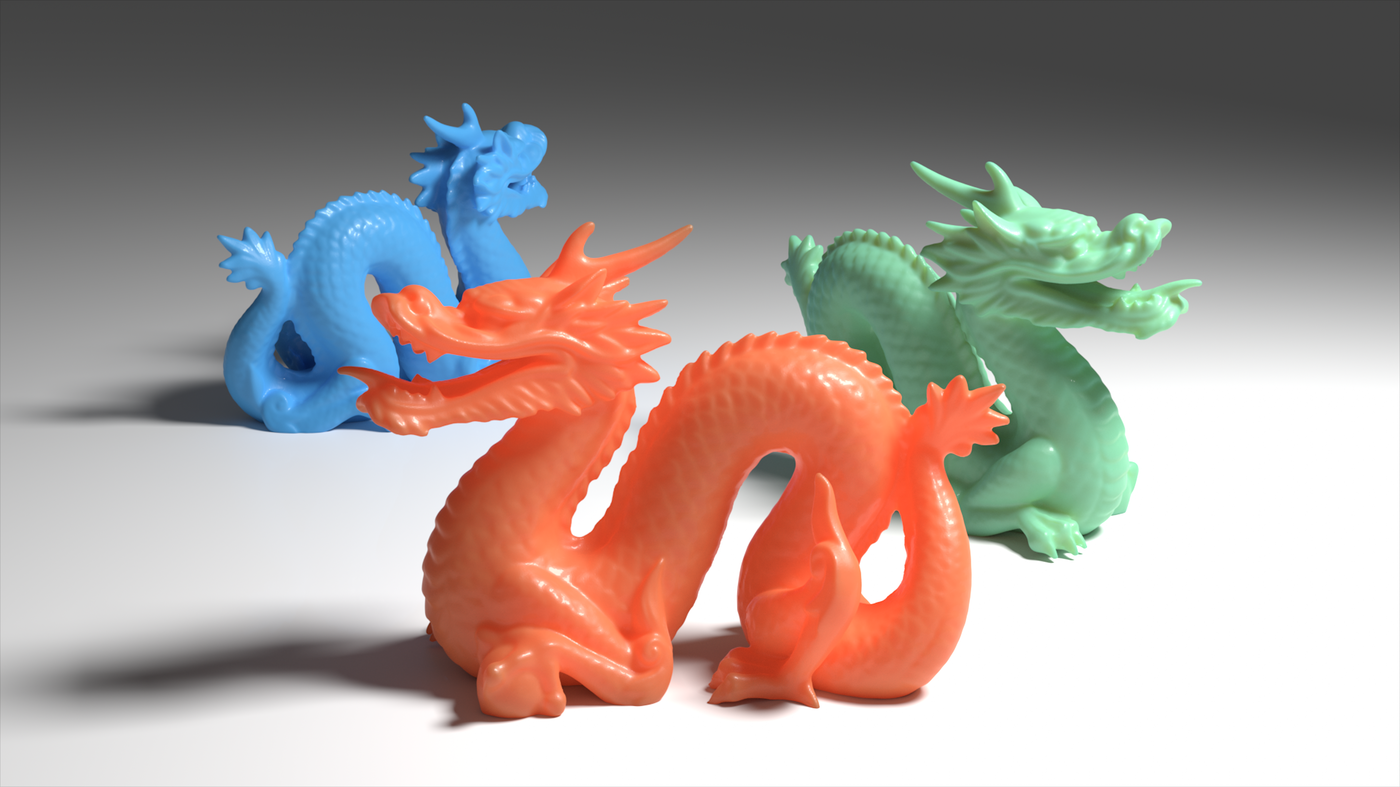
Image output
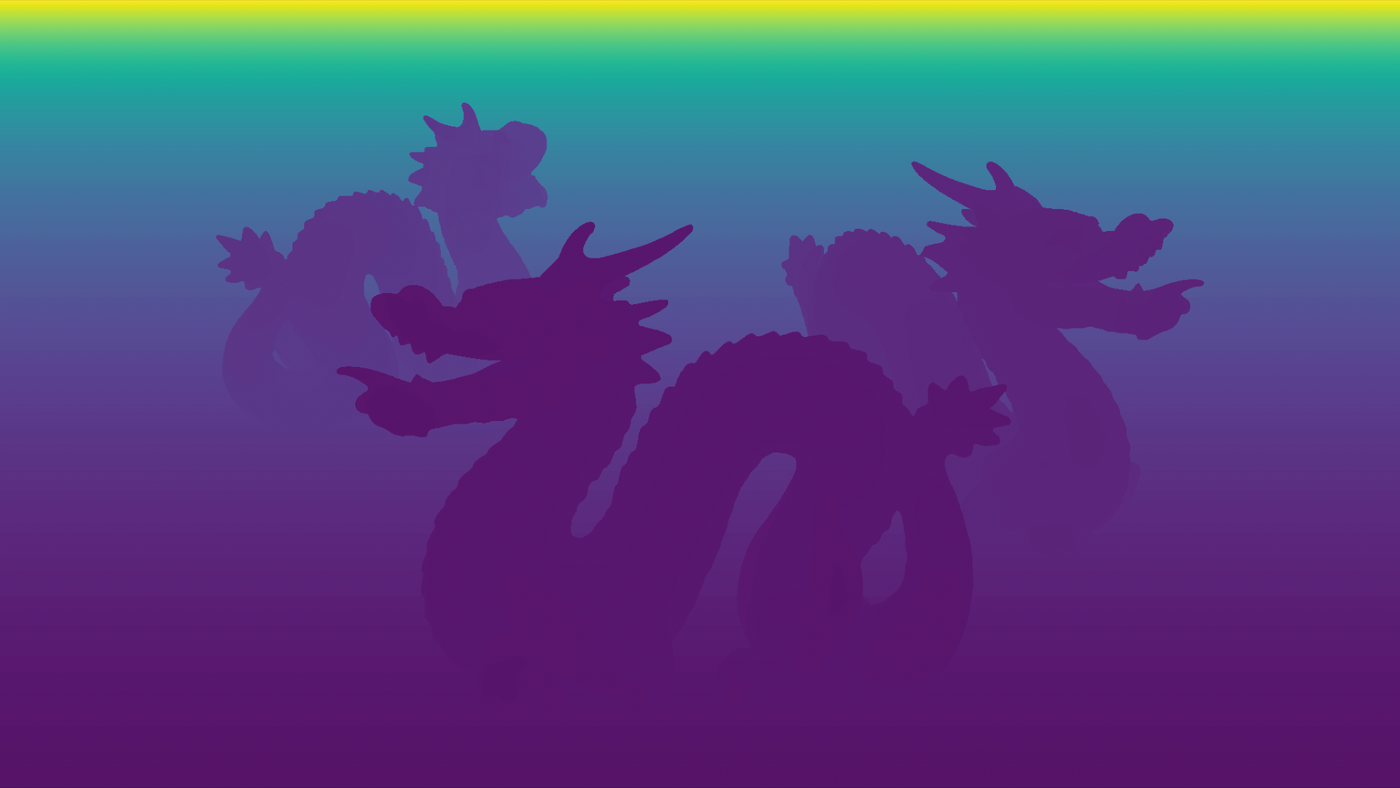
The render has generated three outputs in OpenEXR format: an image output, a depth map, and a semantic segmentation map.
Depth map
Semantic Segmentation map
In the next post, I will look at working with the OpenEXR maps in Python.